
- Видео 71
- Просмотров 2 136 673
The Pottery Wheel
Великобритания
Добавлен 15 дек 2019
Hi, I'm Lesley, welcome to my channel. I will be sharing with you pottery tips and tricks and fun bits of info about ceramics.
I have some free pottery cheat sheets on my website, so do check it out if you want to see what's on offer there.
Thanks for stopping by and don't forget to subscribe!
Lesley
I have some free pottery cheat sheets on my website, so do check it out if you want to see what's on offer there.
Thanks for stopping by and don't forget to subscribe!
Lesley
How to Make a Nerikomi Plate with Colored Clay
This is one way to make nerikomi pottery plates from colored clay. You can also use this technique to make other nerikomi projects.
I go through my simple way of making colored clay, how I prepare the clay, and how I put the nerikomi plate together.
TIMESTAMPS
00:00 - start
0:05 - Making the colored clay
2:44 - Making sample tiles
3:19 - Making the clay into colored bricks
4:06 - Slicing the colored clay
5:29 - Stacking the clay slabs
7:12 - Tidying up the colored clay stack
8:09 - Slicing the stack of clay
8:54 - Cutting the strips of clay
9:37 - Assembling the nerikomi dish
12:18 - Compressing the clay strips together
14:26 - Transferring the clay plate onto the bisque mold
DISCLOSURE:
Some of the lin...
Просмотров: 9 371
Видео


3 Easy Ways to Make a Slab Vase
Просмотров 20 тыс.6 месяцев назад
This is how to make 3 simple slab vase shapes. Each style looks very different but they are all hand-built using the slab pottery technique. You don’t have to use templates to make slab pottery, but it definitely helps. If you want to try out the templates in the video, you can download a copy in the link below underneath the time stamps. TIMESTAMPS 00:00 - start 0:24 - The simple cylinder vase...

Make a plate by hand - no pottery wheel needed
Просмотров 14 тыс.7 месяцев назад
This is how you can make easy handmade plates without a pottery wheel. You don’t need a pottery wheel to make plates, instead, you can use a simple tool called a mushroom anvil to make beautifully shaped plates from pottery clay. TIMESTAMPS 00:00 - start 1:05 - Preparing the clay 2:52 - Cutting out the clay 5:47 - Transferring the slab onto the foam block 6:15 - Using the mushroom anvil 7:59 - ...

Using a pottery kiln at home
Просмотров 4,6 тыс.7 месяцев назад
Here are some important tips about owning and using a pottery kiln at home. If you are considering getting a kiln for home use, there are a few essential things to consider. This video will walk you through choosing and using a pottery kiln at home. TIMESTAMPS 00:00 - Start 0:19 - Space requirements 1:59 - What size kiln do you need? 3:19 - Ventilation 5:10 - Your electrical supply 7:08 - Firin...
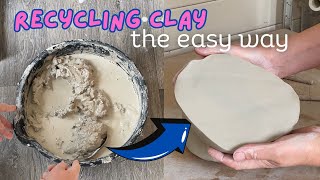
How to Recycle Clay
Просмотров 8 тыс.8 месяцев назад
This is how I recycle my pottery clay. It’s a fast easy way to reclaim your clay and avoid wasting money by throwing away clay scraps and trimmings. I also show you how I make the plaster boards I use to recycle clay too. TIMESTAMPS 00:00 - start 0:11 - Transferring the clay to the plaster board 1:36 - Wedging the clay 3:36 - Making a plaster board to recycle clay 3:40 - What you need to make t...


How to make a clay mug without a wheel
Просмотров 18 тыс.10 месяцев назад
How to make a clay mug without a wheel


How to Make a Template for a Conical Slab Mug
Просмотров 22 тыс.2 года назад
How to Make a Template for a Conical Slab Mug
How to Make a Double Pinch Pot Pitcher
Просмотров 17 тыс.2 года назад
How to Make a Double Pinch Pot Pitcher
Kiln Unloading and Glaze Combinations
Просмотров 16 тыс.3 года назад
Kiln Unloading and Glaze Combinations
Making a Smooth Coil Pot With a Template
Просмотров 18 тыс.3 года назад
Making a Smooth Coil Pot With a Template
Making a Simple Coil Pot - With a Fancy Neck!
Просмотров 9 тыс.3 года назад
Making a Simple Coil Pot - With a Fancy Neck!
can we see it after you fired it?
❤🎉
Yes! I have done this many times. It was a game changer!
Your work is beautiful and your instructions are so comprehensive. And your voice is gentle and soothing. Thank you so much 🙏🏼🤗 Blessings from Australia.
Hah! The artistic process for us all! I do the exact same thing with clothes that I make for myself. Starts with "oh I love this fabric" then goes through "thie project is cool, I'm so glad I'm learning new skills" then finished on the hanger is "hmmm not too bad". Then the try on in front of the mirror, "this is the worst article of clothing ever to exist in the history of the world."
Yes, someone did once say to me that the creative process was a continual cycle of feeling like you are doing ok and then feeling like you are the absolute pits. Still, I guess it beats feeling bored 😂
Self doubt is obviously a well traveled jerk...
This is good
Love❤❤❤❤❤❤❤❤
You’re really talented! Those are beautiful & so are you!
Thank you 😍
Sometimes we think we're just looking for a pleasant surprise but instead we've built unacknowledged expectations. Figuring out what you /wanted/ them to look like just before you open it may help.
Four candles
No thats just me standing on the scales.
Nooo! I'll take the crap one
poor old crap pot. I did rescue him from the bin later. 😅
I go through the same thought process after every painting I do😂😢
It's a roller coaster, right? 🙄😍
@@ThePotteryWheel exactly. And glad to know it's not only me
I go through this with my art! Sometimes you just need to take a step back and
It's weird isn't it? A step back and some time makes such a difference
Underrated channel
hopefully if I share more crap pots, that will change 😂
I love the designs
Thank you 😍
We are our own worst critics.
So true
Save that eautful dispare vase!
😂 I did actually get it out of the bin afterwards!
Uuuuugh!! They’re all so freaking gorgeous! Even the “ugly duckling” 🐥 😅 Seriously beautiful! I wish I could do pottery. The idea of making something beautiful and functional appeals to me, and I love the way they feel in your hand.
@@MyChemicalImbalanceXx Ah thanks for your comment. Makes me feel better about the ugly ducking 😍
Thank you!
The 3 samples at the start are lovely, and . . . oh my, the cabinet
Very enjoyable. Thanks
So nice. Thank you for sharing.
Beautiful until you added blue glaze at top - it's too much contrast to decal. But the technique is very interesting.
So I have an extra room in my basement that has two windows and an outside door (walk-up). The room has a dedicated door and is large enough, honestly, to hold several kilns and also as a dedicated sub-panel near by for electric (used to power some large power tools that needed 220V). But you have me concerned about fumes. If I put a large fan in one of the windows to draw air out of the room while the kiln is firing, do you think that would be sufficient? The room would not be used for anything else other than probably a little miscellaneous storage away from the kiln.
Great! Thank you so much for showing and explaining! Although I'm not a native speaker I could understand everything because you speak clearly in a calm voice. Great plate you made!
New to pottery here. Amazing bravo 🙌🏻…. Question: why do you wait two weeks before firing?
This was a fabulous, comprehensive, thorough, video and I've learnt so much from you! I'm making a dinnerware set for my daughter as a wedding present. You have now made it possible. You're so gentle and calm. Thank you so much 👍
I don't know if you are still checking these comments or not or even if you are still doing this type of firing. I think it's very unique and quite lovely. I would live to see a firing of what the pieces look like after each step. For example. What does the glaze look like if you just fire it with no carbon reduction? Just taking it out of the kiln and cooling it off with no smoke? What does it look like if you don't burp it? Is there a difference in carbon materials? Does paper like you are using give the best results or would straw or sheep's wool give a different result? Also, do you wax these as well? It's very interesting and beautiful. Thank you for sharing.
Without being smoked they look matte black. If you add wax or any other surface treatment, the colors get dull and muddy so its not worthy. You can test yourself by wetting( with water) one such vase in a spot. With wax, oil, any type of lacquer and any type of silicone concrete sealant, they will look like wet, ugly and the colors muted. If you dont burp it then the surface will look like raw copper, salmon pink, with less of the beautiful colors.
منوره
You have opened a new world to me with this information
Thank you so much! This is the best, most helpful kiln opening I have seen! Your work is beautiful! ❤️❤️
Excellent, Thanks
Beautiful! and helpful! Would you please share with me why you used 2 different shredding tools? Thanks!
👍❤
Miss, let me ask you. I'm making a nativity scene model out of clay, but a small part of the base I'm making the buildings and stuff has ripped off around a corner edge, it is small but still a significant part of it. And now this edge isn't properly symmetrical along with the rest of the base and doesn't look great. The piece is on the "bone stage" thing. I know this recipe of yours is meant for cracks and all, but in the case of adding new stuff to the bone stage, is it still possible? Making a new corner out of new fresh clay? I say this because the piece I'm doing isn't small. There are many Bethlehem buildings attached to it. It would take me a lot of time to make the whole thing again, and it would be costly as well because of all the clay involved. But if it isn't possible to fix it, I would have to build it again. I was wondering if I could leave somehow the structure tilted with the broken point submerged in a bowl of water so I could rehydrate only this broken side so I could glue back the new clay.
Hey there. I’m new to clay, but I’m interested in doing jewelry; and found out that metal clay is a thing. The problem is that I have no idea how to go about making a mini electric kiln without exploding or electrocuting myself in the process. And I don’t really know how to make one that would be at a stable temperature for however long the firing would take. Any advice, or maybe a video on safely firing metal clays at home? I’m not sure how big the difference between regular clays and metal clays is.
Wow, no gum arabic needed!
Smothering it
Beautiful. Great video , Thanks for explain the process. I'm just starting to build my raku kiln. Thanks
Can I recommend using vaseline instead, WD40 over time will make the plastic brittle, WD40 will actually swell rubber seals and make plastic brittle
You works so clean, i'm learning a lot whit your video. 15:40 Can you use the compass directly on the clay?
Thank you, Thank you, Thank you!!!!!!
Thanks for the video, it was very helpful.
this simplicity is hard to believe , i love it
The Amaco air dry clay is considered low fire clay
Nice work and beautiful pottery. Here are some tips. Try decorating some using Liquid Salts and Acidic's such as Iodine, Asian Soy Sauce, Raw Lemon or Lime Juice, Sea Water and or Ash & Water mixed with Purple Dye or any colored dye or mixed dyes for that matter.
Her voice is so relaxing
Толково) 👍
How do you keep your clay so smooth and uniform? When I start working with it, it usually becomes cracked.
I was really questioning the difference between air dry clay and the typical clay you would use since both dry up when being left out, until you said kiln and I quickly remembered that normal clay needs to be fired